
Part
II
(Crochet *
Stash-buster)
.jpg)
[Note: I will be
sharing the stitches in the order I made them, but they can be mixed and
matched any way you prefer. All stitch
patterns are designed to match the “multiple of 3+2” rhythm. At the end, I will
share some other stitches that I did not use personally, but can be added to the
Fantasy Blanket].
[Nota: Estaré compartiendo las
puntadas en el orden que yo las hice, pero pueden combinarse y mezclarse como
prefieran. Todos las secuencias están
diseñadas para al ritmo de “múltiplo de 3+2”.
Al final, les compartiré algunas puntadas extras que no usé en la mía,
pero pueden ser añadidas a la Manta Fantasía).
The next part of
the Fantasy Blanket is a row of cute flowers…
La siguiente sección de la Manta
Fantasía es una hilera de lindas flores…

A while ago, I
found the pattern of this cute row of flowers in Pinterest, and I knew I had to
use them in a blanket. In the original
source, this stitch is used as part of a headband (Crochet Flower Bud Headband@ Dearest Debi), but it can easily be adapted to blankets and other
things. [Note: a dear reader pointed out that there is a similar pattern for an afghan in the Red Heart site: "Flowers in a Row". There are some tiny differences with the pattern below, but very similar. Thanks, Katie, for the info!]
Hace un tiempo encontré esta puntada de flores en Pinterest, y la guardé con el in de usarla para una manta. En la fuente original, esta puntada es parte del patrón de una diadema (CrochetFlower Bud Headband @ Dearest Debi), pero puede ser fácilmente adaptado para mantas y otras cosas. Hay otra manta similar en el sitio Red Heart: "Flowers in a Row".
I decided to
re-draw the chart in order to indicate with arrows the direction in which the
rows need to be worked…
Decidí dibujar la puntada para poder
indicar con fleches la dirección en que cada hilera debe tejerse.

Work on the Right
Side (RS) rows 1, 3, 4, 5
Work on the Wrong
Side (WS) rows 2, 6
En la parte delantera, las hileras 1,
3, 4, 5
En la parte de atrás, las hileras 2, 6
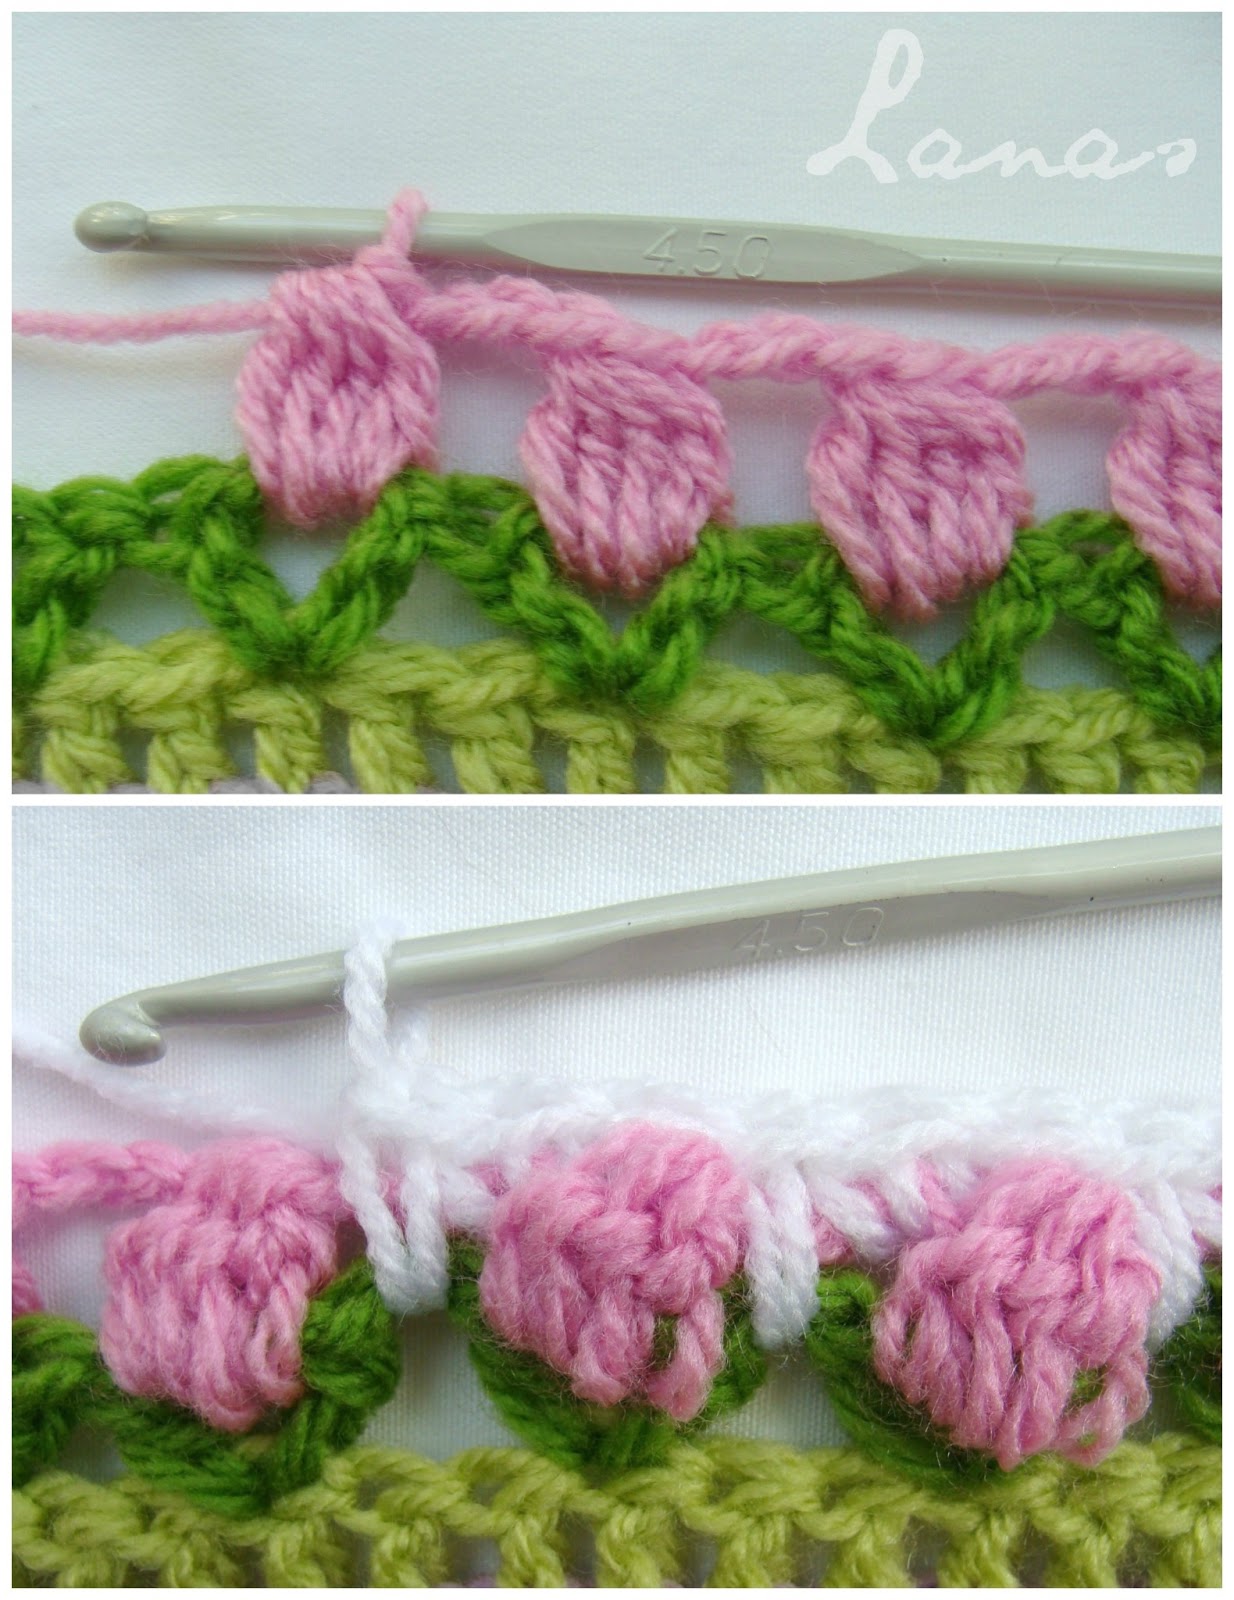
Take note of the
following tips:
* The petals
start and end on the 1-ch space (of the stems).
* The background (“sky”)
starts on which seems the 4th row, but actually are part of the 5th
row. It is a row of all sc’s. Take note of the arrows, which indicate where
you need to make them. *The third sc
is made on top of the petals, the fourth in the 3-chain space, and the fifth
joins the 3-ch space and the space between the stems* (repeat between * and
*). This is the row that will make the
flower pop out.
* If you feel the
flower cluster is too bulky, make it with 4dc tog (instead of 5).
Tomen nota de lo siguiente:
* Los pétalos comienzan y terminan en el espacio de 1 cadena (de los tallos).
* El cielo o fondo comienza en lo que
parece la 4ta hilera, pero en realidad es parte de la 5ta hilera. Es una hilera de solo puntos bajos. Pongan atención a las flechas del diagrama,
donde se indica donde deben colocar los puntos.
* Si sienten que la flor está muy
abultada, háganla con 4 puntos altos (en lugar de 5).

Colors:
For my blanket, I
used the “obvious colors”: light green for the grass, dark green for the stems,
pink for the petals, and white for the background. But you can actually change the colors anyway
you want. For example, someone made the
background and the “grass” all in cream.
To compensate for the lack of grass, she made an extra row of sc’s in
green…

Colores:
Para mi manta, usé los “colores
obvios”, es decir: verde claro para la grama, verde oscuro para los tallos,
Rosado para los pétalos, y blanco para el fondo. Pero pueden hacer cualquier combinación de
colores que prefieran. Por ejemplo,
alguien hizo “la grama” en crema, y para compensar la falta de grama, tejió una
hilera extra de puntos bajos en verde…
This is absolutely gorgeous!
ReplyDeleteHola, me gusta mucho la combinación de puntos y gracias por el tutorial.
ReplyDeletebesos
Love it! Those rosebuds are wonderful! It will be the most beautiful blanket! E x
ReplyDeleteSo lovelly, merci beaucoup for the diagram and tuto.
ReplyDeleteThe colors are tender .
Merci beaucoup;
FleurBelge
Really lovely ..... better get started or I will not catch up !
ReplyDeleteYour fantasy blanket will become a wonderful, lovely projects. This part I love very much. Thank you for sharing it! Greetings from Germany. Sabine.
ReplyDeleteGraaaaaaaaaaaaaaaaaaaaaaaaaacias!!!!!!!!!!!!!!!!!
ReplyDeleteGracias Ana, está muy clarito y bien explicado. Todavía no he terminado de hacer toda la vuelta del primer paso. Mi lana es muy finita, la he puesto doble y la estoy trabajando con aguja del 2, así que he doblado las hileras. Estoy aprovechando unos conos industriales, veremos que tal queda.
ReplyDeleteQue bonita se ve la tuya.
Hola Ana te he encontrado por casualidad, y me he quedado como loca con tu blog es una maravilla, me quedo por aqui.
ReplyDeleteUn besito
so pretty, Ana..
ReplyDeleteThis is awesome, maybe I'll join in on a later date. Really, really tempted...
ReplyDeleteSuch a pretty stitch pattern!
ReplyDeleteuna preciosidad gracias por compartirlo
ReplyDeleteThis blanket is absolutely beautiful!!! But, please, where is Part I?
ReplyDelete~Tess
This is the link to ALL: http://lanasdeana.blogspot.com/search/label/Fantasy%20Blanket
Delete(you can also find it at the bottom of the post above, and on the tab "Blankets")
<3
ReplyDeletePreciosa, gracias por el patrón y las explicaciones.
ReplyDeletedit is heel erg mooi ! ik ga t ook proberen, mercie
ReplyDeleteGreat and that i have a swell give: How Much Remodel House house remodeling near me
ReplyDeletePost was easy to read with light writing. Explore this article of Spacebar Clicker for stepwise tips. Games like Spacebar Clicker show that even the simplest ideas can be a lot of fun. Clicking becomes a rhythm and watching numbers rise feels good.
ReplyDelete